How to Use Safety Signs for Better Communication
Safety signs are essential for workplace safety, especially in diverse environments like Australia. They reduce incidents, improve emergency responses, and ensure compliance with Australian Standard AS 1319. Here’s what you need to know:
- Workplace injuries cost AU$64.7 billion annually (2022 data). Poor hazard communication causes 15–20% of incidents.
- Proper signage can cut manufacturing incidents by 30% and boost safety protocol retention by 60%.
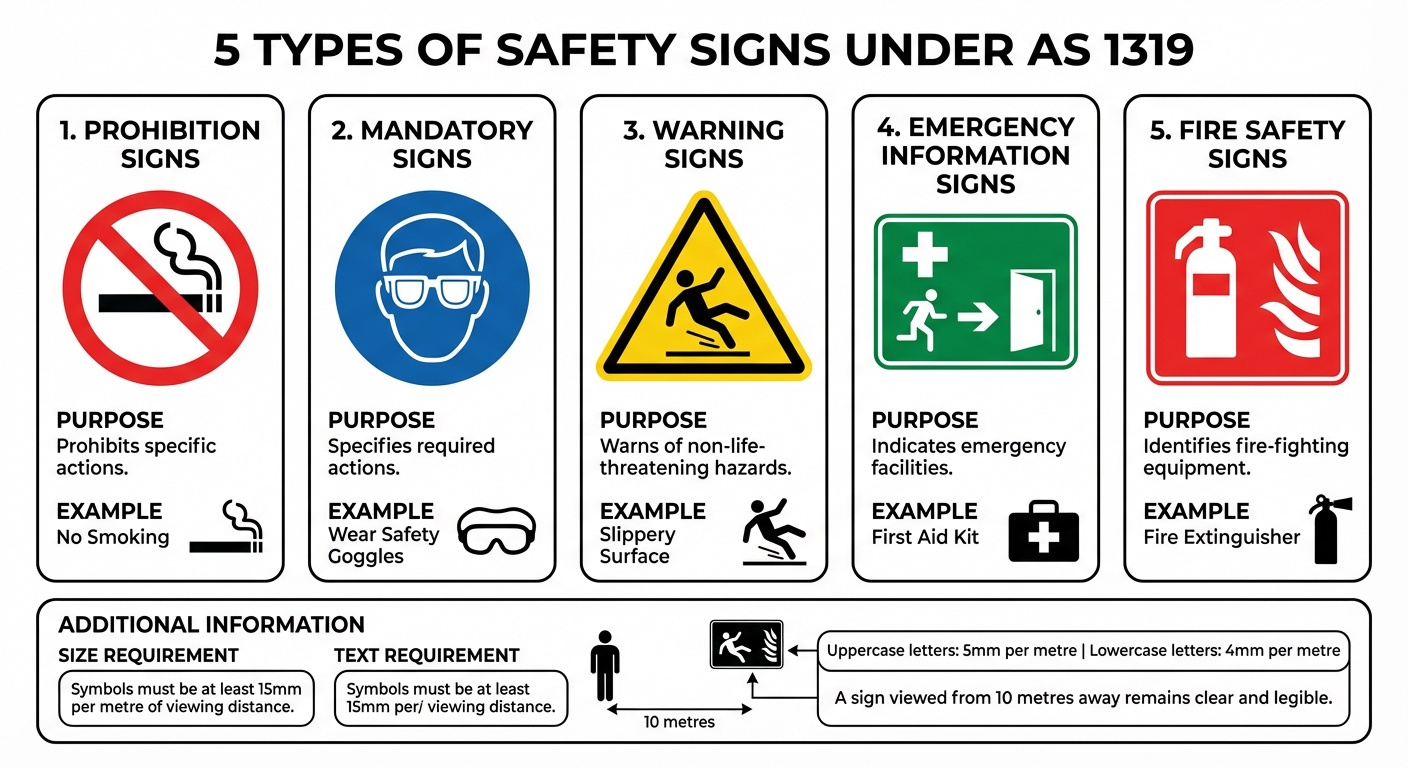
- Australian Standard AS 1319 categorises essential safety signs into five types: Prohibition, Mandatory, Warning, Emergency, and Fire Safety – each with specific colours, shapes, and purposes.
- Signs must be visible, durable, and regularly inspected to meet compliance and avoid fines of up to AU$300,000.
Steps to implement effective safety signage:
- Identify hazards: Conduct walkthroughs and prioritise high-risk areas.
- Choose materials: Use durable options like UV-protected aluminium for Australia’s harsh climate.
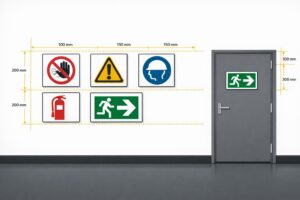
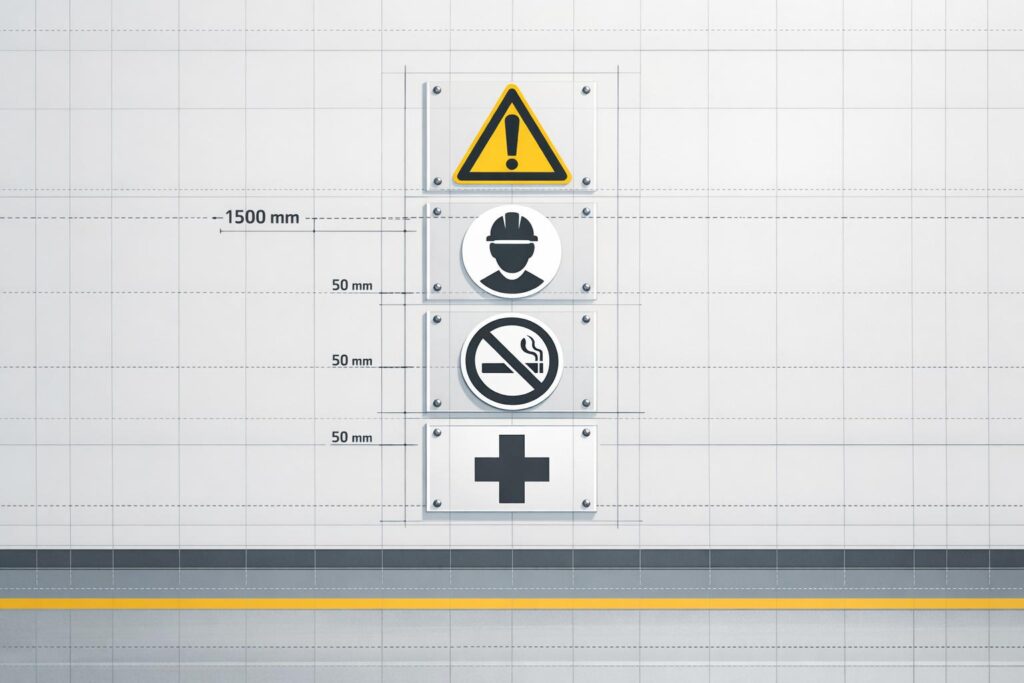
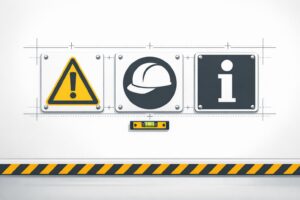
- Position signs: Mount at eye level (1.5–1.7 m) and ensure visibility from required distances.
- Integrate into training: Reinforce safety protocols through toolbox talks and drills.
- Inspect regularly: Replace faded or damaged signs promptly and update for new hazards.
Safety signs are more than compliance tools – they are critical for protecting lives and reducing workplace risks.
Safety Signage
sbb-itb-9950c92
Types of Safety Signs Under Australian Standard AS1319
5 Types of Australian Safety Signs AS 1319 Guide
Australian Standard AS 1319 breaks safety signs into five categories, each designed to communicate specific safety information. Recognising these categories ensures workplaces use the correct signage for various situations, promoting clarity and consistency across sites.
Each type is defined by its shape, colour, and symbol placement, creating a standardised visual system that workers can quickly interpret. For example, a mandatory sign in a Melbourne warehouse will look the same as one in a Sydney construction site, ensuring uniformity.
| Sign Category | Shape & Colour | Purpose | Example |
|---|---|---|---|
| Prohibition | Red circle/slash, white background | Prohibits specific actions | No Smoking |
| Mandatory | Blue circle, white symbol | Specifies required actions | Wear Safety Goggles |
| Warning | Yellow triangle, black symbol | Warns of non-life-threatening hazards | Slippery Surface |
| Emergency | Green rectangle, white text/symbol | Indicates emergency facilities | First Aid Kit |
| Fire Safety | Red rectangle, white text/symbol | Identifies fire-fighting equipment | Fire Extinguisher |
AS 1319 also outlines specific size requirements to ensure visibility. Symbols must be at least 15 mm per metre of viewing distance, with uppercase letters at 5 mm and lowercase letters at 4 mm per metre [2]. This means a sign viewed from 10 metres away remains clear and legible.
Below is a closer look at each category and its purpose in Australian workplaces.
Warning Signs
These yellow triangular signs with black symbols alert workers to potential hazards that require caution but are not immediately life-threatening. A "Slippery Surface" sign is a common example. The triangular shape draws attention, encouraging workers to proceed carefully and assess their surroundings.
Mandatory Signs
Mandatory signs are blue circles with white symbols that indicate actions workers must follow to meet safety protocols. For instance, the "Wear Safety Goggles" sign makes it clear that specific protective gear is required. The distinctive blue colour signals these instructions as compulsory.
Prohibition Signs
Red circular signs with a diagonal slash over a black symbol on a white background communicate prohibited actions. The "No Smoking" sign is a classic example. The red colour and slash symbol provide a clear and universal "do not" message, understood even across language barriers.
Emergency Information Signs
Emergency signs are green rectangles with white text or symbols. These guide workers to emergency resources, such as first aid kits. The green colour is associated with safety and assistance, helping workers quickly locate essential facilities in urgent situations.
Fire Safety Signs
Fire safety signs use red rectangles with white text or symbols to identify fire-fighting equipment. For example, a "Fire Extinguisher" sign ensures workers can immediately find the tools they need to address a fire emergency. The red colour draws attention, signalling urgency and action.
Step 1: Identify Workplace Hazards and Determine Required Signs
Before installing safety signs, the first step is to identify hazards in the workplace. This process starts with a comprehensive walkthrough of all areas, involving employees who work there daily. Their input is invaluable, as they often notice risks that management might miss. According to Safe Work Australia, over 100,000 serious claims were reported in 2022–23, with slips, trips, and falls making up 25%, and machinery incidents accounting for 15%. Proper signage can reduce these incidents by 30–50% [3].
During your walkthrough, categorise and document hazards by type and location. For instance, manufacturing areas might need ‘Overhead Hazard’ warnings, welding zones require ‘Wear Eye Protection’ signs, and warehouses may benefit from forklift awareness signage and warnings about slippery surfaces near loading docks. Even offices aren’t exempt – clear signs for wet floors, emergency exits, and no-smoking areas are essential. Use a risk matrix to prioritise high-risk zones, such as those with heavy machinery or chemical storage, which should be addressed with appropriate danger signs immediately.
Each hazard should be matched with the correct sign type as specified in AS 1319. For example, chemical storage requires danger signs (red diamond), high-voltage equipment areas need prohibition signs (red circle), and first aid stations call for emergency information signs (green square). Avoid generic checklists and instead create a tailored inventory that reflects the specific risks of your workplace.
Involve employees in hazard mapping to uncover risks that might otherwise go unnoticed. Workers can provide insights into daily challenges like poor ergonomics or fatigue-related hazards that could benefit from customised signage. Document all findings in a spreadsheet, detailing each hazard, the required sign type, its proposed location, and a compliance timeline. This becomes your action plan for the next steps.
This thorough inventory lays the groundwork for choosing the right signage design and placement in the following stages.
Step 2: Choose the Right Sign Design and Materials
Once you’ve completed your hazard assessment, it’s time to select sign designs and materials that effectively communicate safety messages and hold up under local conditions. Adhering to AS 1319’s standard colours and symbols ensures signs are easily recognised and understood, even across language barriers. Research shows that using standardised signage can boost safety compliance by up to 40% [1].
For materials, consider Australia’s harsh environment – high UV exposure, temperatures over 50°C, and coastal salt air. Aluminium with a UV-protective film typically lasts 7–10 years, making it a reliable option. Damaged or faded signs not only compromise safety but can also result in WHS compliance breaches, with fines reaching up to AU$300,000. For outdoor or high-traffic areas, reflective aluminium (Class RA1 or RA2) with UV-laminated vinyl is highly recommended. Non-reflective materials lose up to 70% of their visibility at night, which can be a critical safety issue. For indoor spaces with lower exposure, rigid plastic or corflute might be enough, but aluminium offers superior durability.
PXP Safety provides a wide range of AS 1319-compliant signs made from durable aluminium with UV protection and outdoor-grade printing. Their offerings include danger signs, fire equipment signs, first aid emergency signs, mandatory signs, no smoking signs, and parking signs – all designed to withstand Australia’s tough climate while meeting compliance standards.
Next, decide whether standard signage or customised options are better suited to your specific hazards and budget.
Standard Signs vs Custom Signs
After choosing the right material, you’ll need to decide between standard and custom signs. Standard signs are ideal for common risks, like "No Smoking" or "Fire Extinguisher", and are readily available while meeting AS 1319 compliance. Custom signs, on the other hand, are tailored for unique hazards, such as "Beware of Overhead Crane – Max Load 5 Tonnes" for industrial sites or "Authorised Personnel Only – Asbestos Area" for construction zones. Studies show that using customised signage in high-risk areas can reduce incidents by up to 25% [1].
| Feature | Standard Signs | Custom Signs |
|---|---|---|
| Cost | AU$20–50 per sign | AU$50–150+ per sign |
| Materials | Aluminium, UV-protected, rigid plastic | Same options plus adhesive/foam variants |
| Compliance | Pre-certified to AS 1319 | Custom-designed to meet AS 1319 |
| Lead Time | Immediate stock availability | 5–10 business days |
| Use Cases | General hazards (fire, first aid, exits) | Site-specific risks (machinery, unique zones) |
When deciding on materials, match the choice to the environment. Aluminium is the go-to for outdoor use, rigid plastic works well indoors, and reflective options are crucial for traffic zones. Always confirm AS 1319 compliance with supplier certifications, and test custom designs for readability at distances of 5–10 metres before moving forward with production.
Step 3: Position Signs for Maximum Visibility
The most effective safety sign is one that’s easily seen. Proper placement ensures your safety messages are noticed before anyone encounters a potential hazard.
To maximise visibility, mount signs at eye level – typically between 1.5 and 1.7 metres – where people naturally look. In high-risk areas, such as near machinery or chemical storage, position signs so they’re clearly visible before anyone enters the danger zone. Similarly, emergency equipment like fire extinguishers, first aid kits, and eyewash stations should have signs placed directly above or right next to the equipment.
Make sure signs are well-lit, unobstructed, and appropriately sized for the distance they need to be seen from. In larger spaces like warehouses or outdoor worksites, use bigger signs. For example, a sign visible at 2 metres won’t work if it needs to be read from 10 metres away. In poorly lit areas or during night shifts, consider adding dedicated lighting or using reflective materials to ensure signs remain visible.
"The ultimate goal of safety signs is to be seen and understood, so always consider visibility and clarity when choosing locations for your safety signs." – Super Spill & Safety Solutions [4]
Consistency is key, especially in emergencies. Place signs in a uniform manner across your facility – for instance, always position exit signs in the same location relative to doorways. This eliminates confusion when workers need to act quickly. For entrances and exits, ensure signs clearly communicate entry requirements, cautions, or muster point locations. In public areas, use temporary signs for hazards like wet floors and mark restricted zones to safeguard visitors who may not be familiar with your site.
Once signs are properly positioned, incorporate them into your safety training programs to reinforce awareness of hazards and emergency protocols.
Step 4: Use Safety Signs in Workplace Training
Safety signs can play a key role in workplace training, making toolbox talks and emergency drills more effective. When used correctly, they help workers quickly recognise hazards and retain essential safety protocols.
Take the time to familiarise your team with the actual signs they’ll encounter on-site. Show them how these signs are applied in real scenarios. For example, when demonstrating a blue mandatory sign that indicates the need for eye protection, point out where the safety glasses are stored and how to wear them correctly. This approach links the sign’s message to practical actions, making it easier for workers to remember and act accordingly.
"Signs reinforce training; they don’t replace it. Ensure your team understands the meaning behind each sign." – Pinnacle Signage
Incorporate safety signs directly into emergency drills. Use green "Safe Condition" signs to highlight evacuation routes and red "Fire Safety" signs to show where fire equipment is located. Repeated exposure during these drills creates instinctive responses, so workers know exactly what to do when every second matters. During toolbox talks, focus on the signs most relevant to the day’s tasks. Overloading workers with too many signs at once can dilute the message, leading to confusion or missed warnings.
To solidify learning, encourage employees to explain how they would respond to specific signs. Get them actively involved by having them identify and report damaged or missing signage. This hands-on approach not only strengthens their understanding but also fosters a strong safety culture. Regularly review and update training sessions to ensure your signage reflects the current hazards and procedures in the workplace. Outdated or irrelevant signs can undermine trust in your safety measures, so keeping them up-to-date is crucial for maintaining an effective system.
Step 5: Inspect and Update Signs Regularly
Safety signs, even when made from high-quality materials, can deteriorate over time due to fading, physical damage, or dirt accumulation. Additionally, workplace hazards evolve, meaning signs can become outdated. Regular inspections are crucial to ensure compliance with Australian Standard AS 1319 and to maintain a safe working environment. Consistent maintenance helps keep safety communication effective across your workplace.
Create an inspection schedule tailored to your specific needs. For high-traffic or outdoor areas, monthly checks are recommended. Indoor signs may only need quarterly inspections, while high-risk areas should be reviewed weekly. During these inspections, check for issues like fading caused by UV exposure, physical damage such as dents or cracks, peeling laminates, or dirt that obscures the message. Outdoor aluminium signs may also suffer from rust or graffiti, both of which can compromise their effectiveness. A proactive approach to inspections strengthens your overall safety system.
When hazards in the workplace change – such as the introduction of new machinery or the storage of hazardous chemicals – update signage immediately. This aligns with the hazard re-assessment process mentioned earlier. After identifying the new risks, select appropriate signage in line with AS 1319 and replace outdated signs promptly. Using durable materials is key here; for instance, aluminium signs with UV protection from providers like PXP Safety can last up to 7–10 years outdoors, reducing the frequency of replacements and easing inspection workloads.
To gauge the effectiveness of your signage, incorporate incident reviews and employee quizzes into your safety program. Aim for a 90% pass rate on quizzes that test workers’ ability to identify sign meanings or locate emergency equipment. After any workplace incident, review whether inadequate or faded signage played a role. For example, a Queensland warehouse identified faded prohibition signs during routine inspections, replaced them, and subsequently reduced forklift-related incidents by 40% within a year. Bi-monthly quizzes can highlight areas where signage or training needs improvement.
Document all inspection findings, replacements, and quiz results to demonstrate compliance with Australian WHS laws during audits. Non-compliance can lead to fines of up to AU$10,000 per breach, so proper records are vital. Assign clear responsibilities within your team: safety officers should lead inspections, supervisors ensure follow-through, and maintenance teams handle sign replacements. Thorough documentation not only ensures compliance but also supports the continuous improvement of your safety signage system, keeping it as effective as your workforce.
Conclusion
Effective signage establishes a clear and consistent visual language that every worker can understand. By implementing the five key steps – identifying hazards in line with AS 1319, selecting durable materials like UV-protected aluminium, placing signs where they are most visible, incorporating them into training programs, and ensuring regular maintenance – you create a system that not only reduces accidents but also aligns with WHS regulations. Each step plays a role in building a safety framework that supports your workplace safety efforts.
The benefits of proper signage go beyond compliance. According to Safe Work Australia, workplaces with visible mandatory signs in high-risk areas have seen incident rates drop by 20–30%. Similarly, manufacturing sites that use tailored fire safety signage have reduced evacuation times by 15%. These statistics highlight how safety signs serve as practical tools that actively prevent injuries and protect lives.
On the flip side, even the best-designed signs can lose their effectiveness if misused. Signs that are poorly positioned or outdated can lead to non-compliance and even legal issues. Adopting a comprehensive approach – from assessing risks to maintaining signage – helps mitigate these pitfalls. Industry data suggests that such a lifecycle approach can reduce workplace incidents by up to 25%, making it a critical component of any safety strategy.
FAQs
How do I work out what safety signs my site actually needs?
Start by assessing the hazards in your workplace to figure out which safety signs are necessary. Make sure your choices align with Australian standards, particularly AS 1319, which sets the guidelines for safety signage.
A good way to ensure you’re covering all bases is to conduct a safety signage checklist. This will help you identify what signs are needed based on the risks present and any legal requirements.
It’s also important to regularly review the placement and effectiveness of your signs. This ensures they’re still compliant and doing their job to keep everyone safe. If your workplace has unique conditions, customised signs might be a smart option to address those specific needs.
What sign material is best for Australia’s UV and weather?
Aluminium stands out as an excellent choice for Australia’s tough outdoor conditions. Its durability and resistance to UV exposure, extreme temperatures, and coastal salt spray make it perfect for long-term use in demanding environments.
How can I check our signs are AS 1319 compliant?
Regular audits of your safety signs are crucial to ensure they meet AS 1319:1994 standards. These checks should focus on whether the signs are:
- Clearly visible and easy to spot
- Legible, with text and symbols that are not faded or obscured
- Free from damage, such as cracks or wear
- Positioned correctly, ideally at eye level for maximum visibility
By conducting these inspections regularly, you can stay compliant with Australian Standards and WHS regulations, ensuring hazards are communicated effectively and workplace risks are minimised. For expert advice on audit practices, PXP Safety provides valuable guidance to help maintain both safety and compliance.
Related Blog Posts
You may also be interested in
FAQs About Workplace Safety Signs in Australia
AS 1319 sign types, placement, materials and maintenance for workplace safety and WHS compliance in Australia.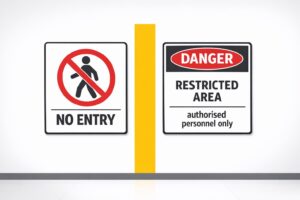
Restricted Area Signs vs. No Entry Signs
Compare No Entry and Restricted Area signs in Australian workplaces — meanings, design differences and AS 1319 compliance.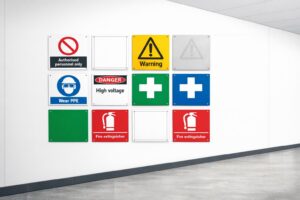
How to Spot Workplace Signage Gaps
Audit your workplace for missing, faded or non‑compliant signs under AS 1319 to reduce incidents and avoid WHS fines.
Symbol Design: Global Standards Explained
Explains ISO 7010 and ISO 3864: standard symbols, colours and sizing for clear, language‑free safety signage and AU compliance.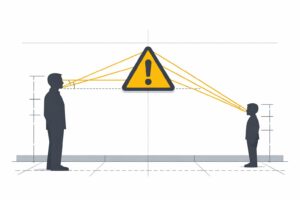
Hazard Sign Visibility Planner
Plan hazard sign placement for max visibility with our free tool. Ensure safety by finding the best spot, height, and angle—try it now!