Adhesive vs. Screw Mounting: Which is Better?
When installing safety signs, choosing between adhesive and screw mounting can impact durability, compliance, and functionality. Each method suits different needs:
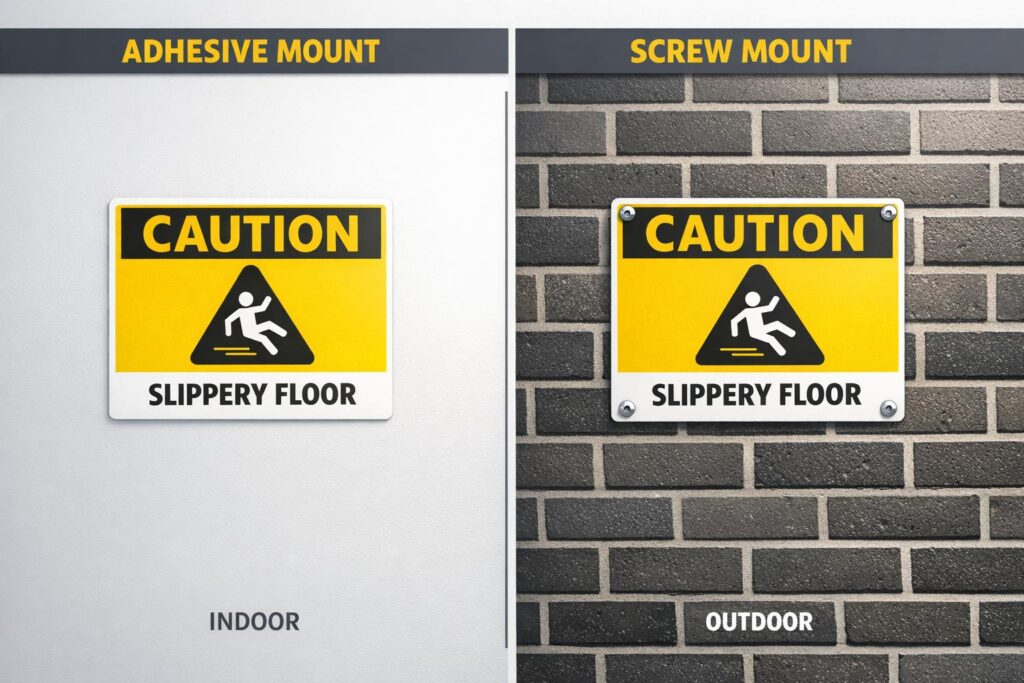
- Adhesive mounting: Quick, tool-free, and ideal for smooth, clean surfaces like glass or polished metal. Best for indoor or light-duty outdoor use but less reliable in harsh weather or high-traffic areas.
- Screw mounting: Durable and secure for rough surfaces like brick or concrete. Ideal for outdoor, high-traffic, or heavy-duty applications but requires tools and leaves permanent holes.
Key considerations:
- Adhesive works well for temporary or rental setups.
- Screws are better for long-term installations.
- Both methods must comply with Australian Standard AS 1319-1994 for safety signage.
Quick Comparison
| Feature | Adhesive Mounting | Screw Mounting |
|---|---|---|
| Cost | Lower – no tools needed | Higher – requires tools and hardware |
| Installation Time | Fast – seconds to apply, 24–72 hrs to cure | Slower – marking, drilling, and securing required |
| Durability | Moderate – may peel in extreme conditions | High – withstands weather and impact |
| Surface Suitability | Smooth, non-porous (e.g., glass, polished metal) | Rough, porous (e.g., brick, concrete) |
| Damage | No holes, but removal may damage finish | Permanent holes remain |
| Best Use | Temporary or indoor signs | Long-term, outdoor, or heavy-duty signs |
Adhesive is great for lightweight, indoor signs. Screws are better for outdoor, permanent, or heavy signs. Always match the method to the surface and environmental conditions.
Adhesive vs Screw Mounting Comparison Chart for Safety Signs
Adhesive Mounting
How Adhesive Mounting Works
Adhesive mounting relies on industrial-grade pressure-sensitive adhesives or high-strength bonding tapes like 3M VHB. The process is simple: peel off the release liner and press the sign firmly onto a clean, dry, flat surface. This ensures even stress distribution and provides strong resistance to tearing and peeling.
For curved or textured surfaces, self-adhesive vinyl works well, while polypropylene signs are better suited to flat surfaces and can withstand temperatures up to 100°C. High-performance adhesives perform reliably across a wide temperature range – from -40°C to 100°C – making them a practical choice for many Australian workplaces[9].
Advantages of Adhesive Mounting
Adhesive mounting is quick and straightforward – just peel and stick. This method eliminates the need for power tools, reducing installation time and avoiding unnecessary disruptions.
It’s also a surface-friendly option, making it perfect for rental properties where avoiding damage is essential. The result is a clean, seamless finish. Self-adhesive vinyl signs can last up to 7 years outdoors and over 8 years indoors, providing a durable solution for various signage needs[3]. However, it’s worth noting that adhesive mounting isn’t suitable for every environment.
Drawbacks of Adhesive Mounting
There are some downsides to adhesive mounting. The surface must be thoroughly clean and dry for the adhesive to bond properly. Dust, moisture, or oil can weaken the adhesion, leading to peeling over time. Additionally, self-adhesive vinyl typically has a heat tolerance limit of around 80°C, making it unsuitable for extremely high-temperature areas like boiler rooms or near industrial ovens[5].
Adhesives can also be affected by harsh weather, high humidity, and intense UV exposure, which may cause them to peel, fade, or shrink. While standard self-adhesive vinyl is best for indoor use, industrial-grade adhesives are better equipped to handle extreme outdoor conditions. For high-wind or particularly challenging environments, mechanical fixings provide a more secure alternative. Regular inspections – recommended every 6 to 12 months – can help identify and address any issues early on[10].
Screw Mounting
How Screw Mounting Works
Screw mounting provides a permanent solution for securing signs. The process begins by surveying the site, marking the desired location, and drilling holes using the correct tool for the surface. For masonry, a rotary hammer drill works best, while a cordless screwdriver is ideal for wood and metal surfaces[12].
Most rigid safety signs are designed with pre-drilled 4mm mounting holes in each corner[3]. For hollow walls, wall anchors are necessary, while self-tapping stainless steel screws paired with nylon washers ensure a secure fit. Washers play a key role in distributing pressure and preventing the screws from damaging the sign material[11][6]. Using a spirit level ensures the sign is perfectly horizontal, which is vital for compliance and a professional appearance[12].
| Tool / Material | Purpose |
|---|---|
| Rotary Hammer Drill | Drills into masonry, brick, or concrete surfaces[12] |
| Cordless Screwdriver | Drives screws into wood, metal, or wall anchors[12] |
| Self-Tapping Screws | Stainless steel screws are ideal for wood, metal, and brick[11] |
| Nylon Washers | Prevent screw heads from damaging or pulling through the sign[11][6] |
| Wall Anchors | Provide secure mounting for hollow walls or masonry surfaces[12] |
| Spirit Level | Ensures the sign is horizontally aligned before drilling[12] |
By following these steps, screw mounting ensures a durable and dependable solution, even in tough conditions.
Advantages of Screw Mounting
Once installed, screw mounting offers several benefits. Signs mounted with screws are built to last: metal signs can endure 5 to 8 years outdoors, while polypropylene signs typically hold up for 3 to 5 years in challenging environments[5][3]. This durability makes screw mounting an excellent choice for permanent installations.
This method excels where adhesives fail, handling temperature changes, high moisture, and uneven surfaces like brick or textured concrete with ease[5][11]. Additionally, screw-mounted signs are far more resistant to vandalism and accidental damage, making them ideal for high-traffic areas where durability is essential[6][14].
For heavy-duty applications, such as freestanding signs or pylons, screws provide the structural strength that adhesives simply can’t match[13]. They ensure signs stay securely in place, even in windy locations or areas prone to vibration. This method also complies with Australian safety standards, making it a reliable choice for demanding environments.
Drawbacks of Screw Mounting
The biggest downside to screw mounting is the permanent damage it causes to surfaces. Drilling holes locks you into that specific location, which can be an issue for rental properties or temporary signage needs. Unlike adhesive methods, screw-mounted signs can’t be removed cleanly.
The installation process is more time-consuming and requires additional tools and materials. You’ll need a drill, suitable bits, screws, washers, and potentially wall anchors, as well as the time to measure, mark, drill, and secure everything properly[12]. Mistakes, such as skipping washers, can lead to tearing the sign material, and drilling errors permanently damage the mounting surface[6].
"To prevent the screw head from penetrating the sign, washers must be used." – Integral Fire Protection[6]
When attaching aluminium signs to steel frames, using rubber or nylon gaskets is essential to prevent galvanic corrosion between the two metals[13].
While screw mounting is a robust and reliable method, its permanence and the effort required for installation may not suit every situation.
Side-by-Side Comparison
Comparison Table
Here’s a breakdown of the key differences between adhesive and screw mounting:
| Feature | Adhesive Mounting | Screw Mounting |
|---|---|---|
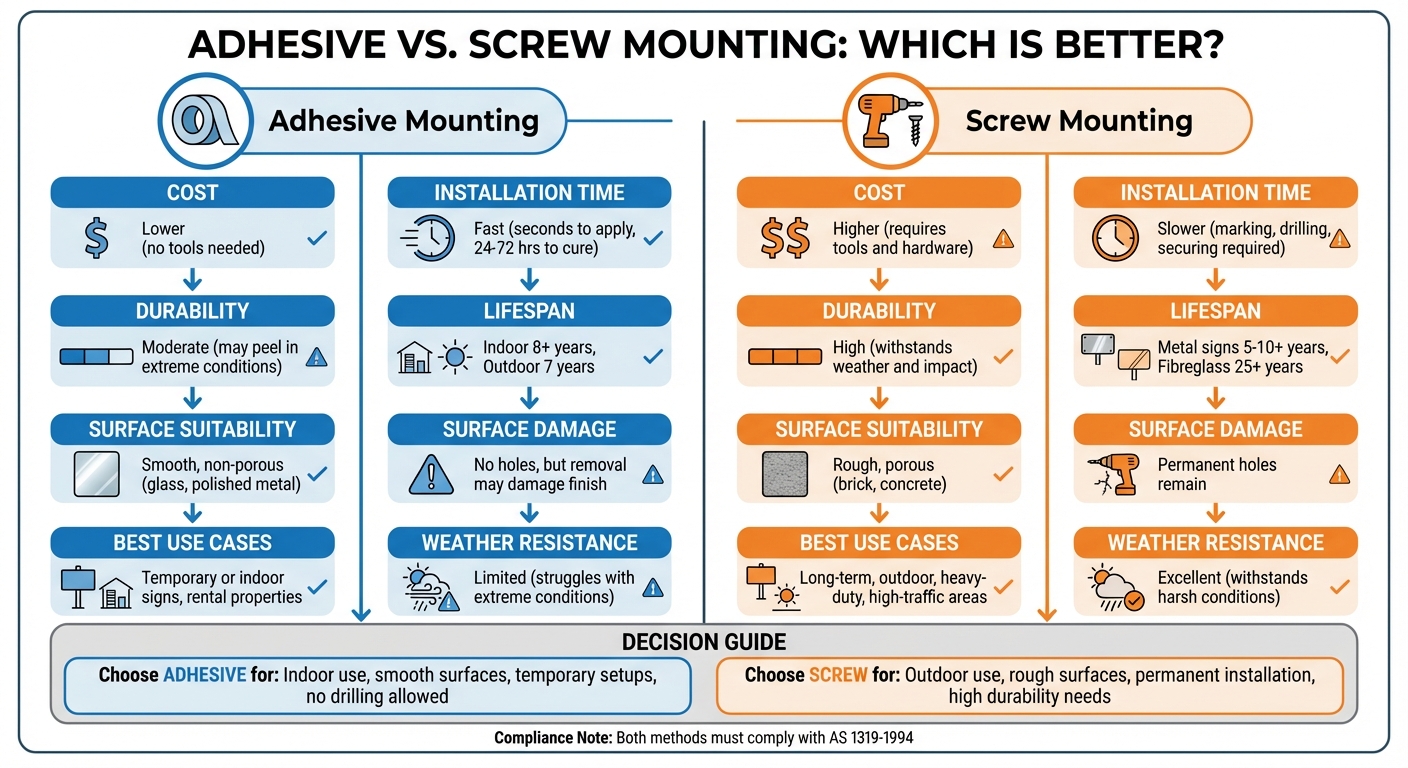
| Initial Cost | Low – no need for hardware or tools [4] [17] | Higher – requires a drill, screws, washers, and wall anchors [17] |
| Installation Time | Quick – just seconds to apply, but 24–72 hours to cure fully [4] [15] | Takes longer – involves measuring, drilling, and securing, ranging from minutes to hours [4] [17] |
| Durability | Moderate – may peel or fade over time [4] [17] | High – resistant to impact and weather [4] [17] |
| Typical Lifespan | Indoor: 8+ years; Outdoor: up to 7 years (vinyl) [3] | Metal signs: 5–10+ years; Fibreglass: 25+ years [4] [17] |
| Suitable Surfaces | Smooth surfaces like glass, laminate, polished timber, and melamine [15] [16] | Rough or porous surfaces such as brick, concrete, stone, timber, and fences [8] [16] |
| Surface Damage | No holes, but removal can damage paint or finish [15] | Permanent drill holes left behind [4] |
| Best For | Indoor notices, temporary outdoor use, and smooth equipment panels [4] [15] | Permanent outdoor setups, high-traffic areas, and vandal-prone locations [4] |
| Removability | Often hard to remove without damaging the surface [15] | Removable, but holes remain [16] |
| Weather Resistance | Limited – struggles with extreme heat, cold, and moisture [1] [15] | Excellent – withstands temperature changes and harsh conditions [4] |
Adhesive mounting is perfect for quick, cost-effective setups, especially indoors or for short-term needs. On the other hand, screw mounting is the go-to for lasting installations that can endure tough environments.
When to Use Each Method
Building on the comparison above, here’s some advice to help you decide on the best mounting method for your safety sign.
When to Use Adhesive Mounting
Adhesive mounting is your best option for smooth, flat surfaces like glass, polished metal, or smooth interior walls [12][18][16]. It’s especially handy for lightweight signs in indoor spaces where a clean, screw-free look is preferred [7][16].
Before applying adhesive, make sure the surface is properly prepared. Use a 70/30 solution of isopropyl alcohol and water to clean the area, removing oils and other contaminants that could weaken the bond [12]. Once applied, adhesive-mounted signs generally last around 7–8 years, depending on the conditions they’re exposed to.
This method is also perfect for rental properties where drilling isn’t allowed. For temporary signage or when you need a quick, tool-free installation, adhesive mounting works wonders. Just keep in mind, it takes 24–72 hours for the adhesive to fully bond [4].
When to Use Screw Mounting
Screw mounting, on the other hand, is the way to go when you need structural support and long-term durability. It’s ideal for rough or porous surfaces like brick, concrete, unfinished timber, or stone [12][16]. This method is often used for heavy-duty signs such as parking notices, industrial safety signs, or large monument signs [4][7].
For outdoor installations, screw mounting is the most reliable choice. It provides excellent durability in tough conditions, standing up to wind, UV exposure, and temperature changes – important factors in Australia’s challenging climate.
Screw mounting is also the preferred option for high-traffic or vandal-prone areas, as it makes signs more tamper-resistant [6][4]. When installing, remember to use washers to spread the pressure evenly and avoid cracking the sign. Don’t over-tighten screws, as this can damage the material [16][6]. For concrete or masonry surfaces, rawl-type wall plugs or hollow wall anchors are recommended. In coastal areas, opt for 316-grade stainless steel hardware to prevent corrosion [16][12][13].
These mounting methods align with Australian safety standards, which will be explored further in the next section.
sbb-itb-9950c92
Australian Standards and Compliance
The Australian Standard AS 1319-1994 specifies that the mounting method for safety signs must align with its intended use [2]. This builds upon the earlier discussion of evaluating mounting methods.
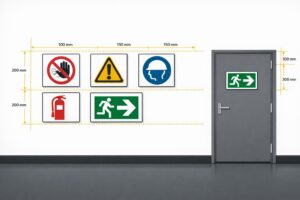
AS 1319 places a strong emphasis on visibility. Pictograms need to measure at least 15 mm for every metre of viewing distance. Text size requirements are set at 5 mm per metre for uppercase letters and 4 mm per metre for lowercase. In low-light conditions, these dimensions must increase by 50% [2][3]. Additionally, the sign must be placed within the observer’s direct line of sight and against a contrasting background. For specific signs like exit signs, further mounting requirements, such as height specifications under AS 2293.1, must also be followed [19].
Durability is another critical factor. Mounting methods must ensure signs remain secure and legible throughout their expected lifespan. For instance, self-adhesive vinyl is suitable for over eight years indoors and up to seven years outdoors. Meanwhile, rigid materials like Colorbond steel, when screw-mounted, can last between five and eight years outdoors [3]. These methods must comply with AS 1319 to ensure reliability, even in Australia’s harsh climate.
The type of surface also plays a role in compliance. Adhesive mounting works best on clean, dry surfaces to avoid premature failure [3]. For porous surfaces such as brick or concrete, screw mounting is required to meet durability standards. Regular inspections, ideally every three months, are recommended to maintain compliance [20].
"AS1319 does not specify a required material or nominal size for a safety sign but does stress that the type of safety sign used should be suitable for the intended application." – WorkSafe ACT [2]
In the next section, we’ll explore how to mount PXP Safety signs while adhering to these Australian standards.
Mounting PXP Safety Signs
PXP Safety’s 1.6 mm aluminium signs are designed for easy installation using either adhesive or screws. Each sign comes with 4 mm pre-drilled holes in all four corners and rounded edges for safety, making screw mounting straightforward and secure [3].
For outdoor use, screw mounting is ideal for securing signs to posts, fences, or brick walls. Thanks to their waterproof and rust-resistant construction, these signs are built to last for decades. Non-reflective signs come with a 7-year warranty, while HIP/Class 1 reflective signs are covered for 10 years [21].
For indoor applications, adhesive mounting works best on smooth surfaces like equipment panels or laminate doors. Ensure the surface is prepared as outlined earlier [15][4], and allow 48 hours for the adhesive to fully cure [15]. On heavily textured surfaces, structural silicone is recommended over standard adhesive backing for a more secure hold [15].
All PXP Safety signs are coated with a UV protective film, ensuring they remain visible and resistant to fading under Australia’s intense sun, no matter which mounting method you choose [21]. Custom sizes are also available, and all signs are made from durable aluminium and comply with AS 1319-1994 standards [21].
To maintain your signs, clean them with warm soapy water and a microfibre cloth. Avoid using harsh chemicals, as they can damage the finish [15]. These mounting options and care instructions ensure PXP Safety signs deliver long-lasting performance and meet Australian standards for durability.
Conclusion
Choosing the right mounting method depends on factors like the surface type, location, and the weight of the sign. Adhesive mounting is best suited for smooth, clean, non-porous surfaces in indoor, climate-controlled settings. It offers a quick, tool-free solution. On the other hand, screw mounting excels on textured or porous surfaces, outdoor locations, and for heavier signs that demand durability over time. Understanding these differences ensures each mounting method serves its purpose effectively for compliance and longevity.
For outdoor safety signage that must endure Australia’s harsh weather conditions, screw mounting provides the necessary strength for a lifespan of 5–10+ years [4]. Adhesive mounting is ideal for lightweight indoor signs on smooth surfaces, especially in situations where drilling isn’t an option. For heavier signs – those weighing more than 9 kg – screw mounting is the safest choice to ensure stability over time.
As mentioned earlier, proper adhesive curing and precise screw installation are essential for maintaining long-term performance.
PXP Safety designs its signage to accommodate both mounting methods. Their 1.6 mm aluminium signs come with pre-drilled 4 mm holes, making them compatible with screw mounting or industrial-grade adhesives on smooth surfaces. All signs meet AS 1319-1994 standards and feature a UV protective film to handle Australia’s intense sunlight. Whether you’re after danger signs, fire equipment labels, or custom safety signage, selecting the right mounting method ensures your workplace remains safe and compliant.
Explore the full range of compliant safety signs at PXP Safety and find the ideal solution for your mounting needs.
FAQs
What’s the best way to mount safety signs: adhesive or screws?
When deciding between adhesive and screw mounting for signs, the choice largely depends on the sign’s material, its weight, and the type of surface it will be attached to.
Adhesive mounting works best for lightweight signs on smooth, clean surfaces such as painted timber, laminate, or melamine. It’s easy to apply, provides a tidy finish, and is ideal for permanent installations. However, keep in mind that removing the sign later could damage the surface.
On the other hand, screw mounting is the go-to option for heavier signs, uneven or textured surfaces, or when a secure yet removable fix is needed. This method involves drilling pilot holes, inserting wall plugs, and using screws – often with washers to protect the sign. While it requires more effort and tools, it offers greater durability and allows for repositioning or removing the sign without causing damage to the wall.
For lightweight signs on flat, smooth surfaces, adhesive mounting is usually sufficient. However, for sturdy aluminium signs or installations on rough surfaces or in high-traffic areas, screws provide a more reliable solution. Choosing the right mounting method based on the sign and wall conditions ensures a safe, durable result that adheres to Australian workplace safety standards.
What are the durability differences between adhesive and screw mounting over time?
Adhesive mounting offers a durable solution that often outlasts traditional screw mounting. One of its key advantages is that it eliminates the need for drilling holes, which can weaken materials and create stress points or areas prone to corrosion. By preserving the surface’s integrity, adhesive mounting can help extend the lifespan of the material.
Another benefit is its resistance to rust and corrosion, issues that commonly affect metal screws, especially in humid or outdoor conditions. For applications like safety signs, adhesive mounting not only provides a neat, seamless appearance but also avoids the potential damage that mechanical fasteners might cause.
How does the Australian Standard AS 1319-1994 influence safety sign mounting choices?
The Australian Standard AS 1319-1994 outlines how safety signs should be mounted to ensure they remain secure, visible, and compliant. Signs must be attached to stable, non-moveable surfaces, such as walls, and kept away from walkways or areas where they might hang too low. Additionally, the standard specifies that mounting methods should allow for easy removal without the need for specialised tools, making replacements straightforward when required.
For lightweight signs, adhesive mounting is a practical option, provided the surface is clean and dry. This method offers a low-profile and tamper-resistant solution. On the other hand, heavier signs or those placed in areas exposed to frequent vibrations, temperature fluctuations, or regular cleaning are better suited to screw mounting. This approach provides greater durability and can be reused if needed. Regardless of the mounting method, signs should always be installed at eye level and positioned against a contrasting background to maximise visibility and meet the requirements of AS 1319-1994.
Related Blog Posts
You may also be interested in
FAQs About Workplace Safety Signs in Australia
AS 1319 sign types, placement, materials and maintenance for workplace safety and WHS compliance in Australia.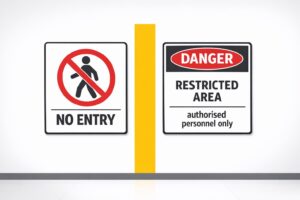
Restricted Area Signs vs. No Entry Signs
Compare No Entry and Restricted Area signs in Australian workplaces — meanings, design differences and AS 1319 compliance.
How to Spot Workplace Signage Gaps
Audit your workplace for missing, faded or non‑compliant signs under AS 1319 to reduce incidents and avoid WHS fines.
Symbol Design: Global Standards Explained
Explains ISO 7010 and ISO 3864: standard symbols, colours and sizing for clear, language‑free safety signage and AU compliance.
Hazard Sign Visibility Planner
Plan hazard sign placement for max visibility with our free tool. Ensure safety by finding the best spot, height, and angle—try it now!