Wayfinding Sign Placement Rules Australia
Wayfinding signs in Australia are critical for safety and accessibility. They guide people through spaces, especially during emergencies, and ensure compliance with legal standards. Proper placement and maintenance of these signs are mandatory under the National Construction Code (NCC) and Australian Standards, including essential safety signs under AS 1319-1994 and AS/NZS 2293 for exit signs. Key requirements include:
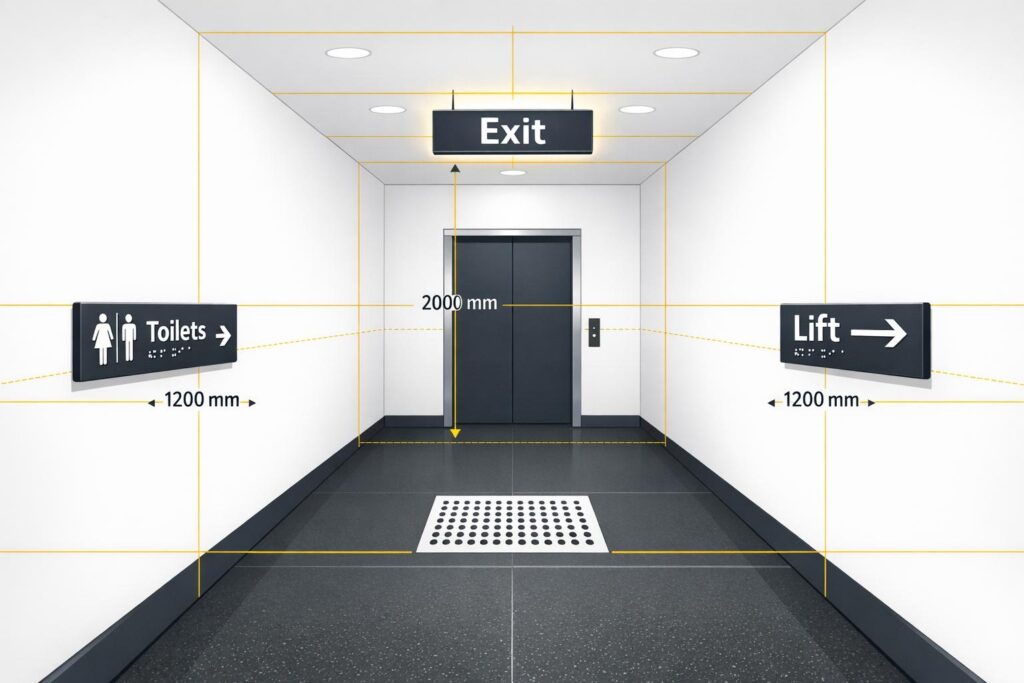
- Placement: Signs must be positioned at decision points, such as intersections and exits, and mounted at appropriate heights (1,200–1,600 mm for braille and tactile signs).
- Visibility: Use clear, contrasting colours and ensure signs are readable from a distance (e.g., pictograms sized 15 mm per metre of viewing distance).
- Lighting: Emergency signs must remain visible during power outages for at least 90 minutes, with a minimum illumination of 0.2 lux.
- Accessibility: Braille and tactile signs must meet specific design and placement criteria, including mounting on latch-side walls and ensuring tactile text is raised.
- Maintenance: Regular inspections (every six months or after changes) are required to check for damage, fading, or obstructions. Replace or repair signs promptly to ensure compliance.
Australian Regulations for Wayfinding Sign Placement
Applicable Standards
Wayfinding sign requirements in Australia are primarily governed by the National Construction Code (NCC). This includes Part E4, which addresses emergency and exit visibility, and Specification 15, which provides details for braille and tactile signs [1].
A key standard in this area is AS 1428.4.2-2018, titled "Means to assist the orientation of people with vision impairment – Wayfinding signs". This standard outlines best practices for wayfinding signage, focusing on areas such as site identification, shorelining, and signage placement at decision points. Dr Bronwyn Evans, CEO of Standards Australia, emphasised its importance, stating:
"Anything done to help those who are blind or vision impaired navigate our built-up areas with confidence is an achievement for the entire Australian public" [7].
Other relevant standards include:
- AS/NZS 2293.1: Covers the design of exit signs and emergency lighting.
- AS 3745:2010: Provides guidelines for evacuation diagrams.
- AS 1428.1: Addresses general access and mobility requirements [1][4].
The Disability (Access to Premises – Buildings) Standards 2010 further ensures equitable access for all individuals. This includes adherence to the "Access Code", which aligns closely with NCC requirements [4]. These regulations apply to a broad range of building classes, including Class 3, 5, 6, 7, 8, 9, and 10, as well as certain Class 1b and Class 2 buildings used for short-term accommodation [4].
Together, these standards ensure wayfinding signs enhance emergency preparedness, evacuation clarity, and accessibility for people with disabilities. They also provide detailed guidance on placement and design to maximise usability.
Accessibility Requirements
To meet accessibility regulations, braille and tactile signs must follow specific guidelines for placement and design. These include:
- Mounting height: Signs must be installed between 1200 mm and 1600 mm above the finished floor level.
- Tactile text placement: For single-line text, tactile elements should be positioned between 1250 mm and 1350 mm. Signs are typically placed on the latch-side wall of the door, with the leading edge between 50 mm and 300 mm from the architrave.
- Contrast and finish: Signs must have a minimum luminance contrast of 30%, use a matte finish to minimise glare, and feature tactile text in Arial typeface raised 1–1.5 mm.
- Braille requirements: Grade 1 Braille must be positioned 8 mm below tactile text [1][5][6].
Signs should only be mounted on doors when wall placement isn’t an option, as door-mounted signs can increase collision risks when the door is opened [1][6]. Adhering to these precise measurements ensures compliance with legal standards while prioritising safety and functionality.
sbb-itb-9950c92
How to Place Wayfinding Signs Correctly
Making Signs Visible and Readable
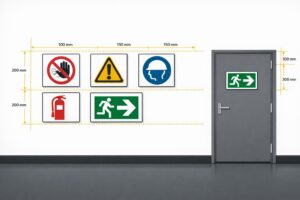
Effective wayfinding signs rely on clear visibility and legibility, which are guided by Australian Standard AS 1319-1994. The standard specifies that pictograms must measure at least 15 mm per metre of viewing distance, while upper case text requires a minimum height of 5 mm per metre, and lower case text needs 4 mm per metre [2][8]. For example, a sign designed to be read from 10 metres away should feature pictograms at least 150 mm tall and upper case text at least 50 mm high.
Lighting plays a critical role in visibility. In low-light conditions or areas with challenging viewing angles, the dimensions of pictograms and text should be increased by 50% [2]. This means a pictogram normally sized at 150 mm would need to be 225 mm in poorly lit spaces, such as dim corridors or stairwells. Signs should also be mounted at eye level and placed against a contrasting background to ensure they stand out, as required by Australian standards [2].
Using Consistent Placement
Consistency in sign placement helps people locate information faster, especially during emergencies when time is crucial. Keeping signs at a uniform height and position throughout a facility creates predictable patterns that are easier to recognise.
Regular checks are necessary to ensure signs remain visible. Obstructions like stacked materials, equipment, or open doors can render even the most well-placed signs useless. Maintenance routines should include cleaning to remove dirt and verifying that lighting is adequate. Over time, dirt and poor illumination can significantly reduce a sign’s effectiveness [2]. Consistent placement also ensures that navigation decisions are made smoothly, enhancing the overall wayfinding experience.
Positioning Signs at Decision Points
The true value of wayfinding signs comes from their placement at critical decision points – areas where people need to choose their direction [10]. These are the spots where clear guidance matters most.
At these decision points, signs should be installed at pedestrian eye level, not elevated like road signs. They must also be free from obstructions such as vegetation or other barriers [10]. To avoid overwhelming users, consolidate multiple pieces of information into a single sign [10]. Adding details like "Exit: 2 mins" or specific distances in metres can provide helpful context and assist with route planning [10]. In low-light areas, ensure signs are illuminated to maintain visibility [10][2].
8 Signage Mistakes in Wayfinding Design You Need to Avoid
Technical Requirements for Wayfinding Signs
Building on placement and accessibility guidelines, these technical specifications ensure wayfinding signs are reliable, visible, and meet compliance standards.
Materials and Durability
The choice of material plays a key role in a sign’s lifespan and compliance. While AS 1319-1994 doesn’t specify a mandatory material, it does require that the material be suitable for the environment where the sign will be installed [2].
For indoor, high-traffic locations, durable plastics like PVC or Traffolyte are ideal as they withstand frequent wear and tear [1]. For semi-outdoor areas, brushed aluminium is a solid option due to its resistance to weather conditions [1]. To combat fading, UV-printed substrates are recommended [1].
To minimise glare and comply with NCC Specification 15, opt for a matte or low-sheen finish [1]. In areas prone to vandalism, protective overlay films can add an extra layer of durability and graffiti resistance [11].
Additionally, ensure the signs are well-lit to maintain visibility during emergencies.
Lighting Requirements
Emergency and exit signs must function immediately during power outages and remain operational for at least 90 minutes [9][1]. They should provide a minimum illumination of 0.2 lux along egress paths [1].
Photoluminescent signs require a dedicated light source delivering at least 100 lux directly to the sign face, with a colour temperature of 4000 K or higher [12]. These signs must maintain a luminance of at least 30 mcd/m² for 90 minutes and have a maximum viewing distance of 24 metres [12].
Size and Colour Standards
Adhere to AS 2700 for consistent colour usage across signs [3][11]. Specific combinations include:
- Prohibition signs: Black on white with a red circle/slash.
- Mandatory signs: Black on white within a blue circle.
- Emergency information signs: White on green [1].
Ensure text and background have at least 30% luminance contrast [1]. For braille, use Grade 1 (uncontracted) braille, positioned 8 mm below the text. Tactile elements should be mounted between 1,200 mm and 1,600 mm above the floor to ensure accessibility [1].
Wall-Mounted vs Freestanding Signs
Wall-Mounted vs Freestanding Wayfinding Signs Placement Requirements Australia
When it comes to wayfinding, the choice between wall-mounted and freestanding signs plays a crucial role in ensuring safety and compliance with accessibility standards.
Your decision should hinge on factors like location, accessibility, and the type of information being conveyed.
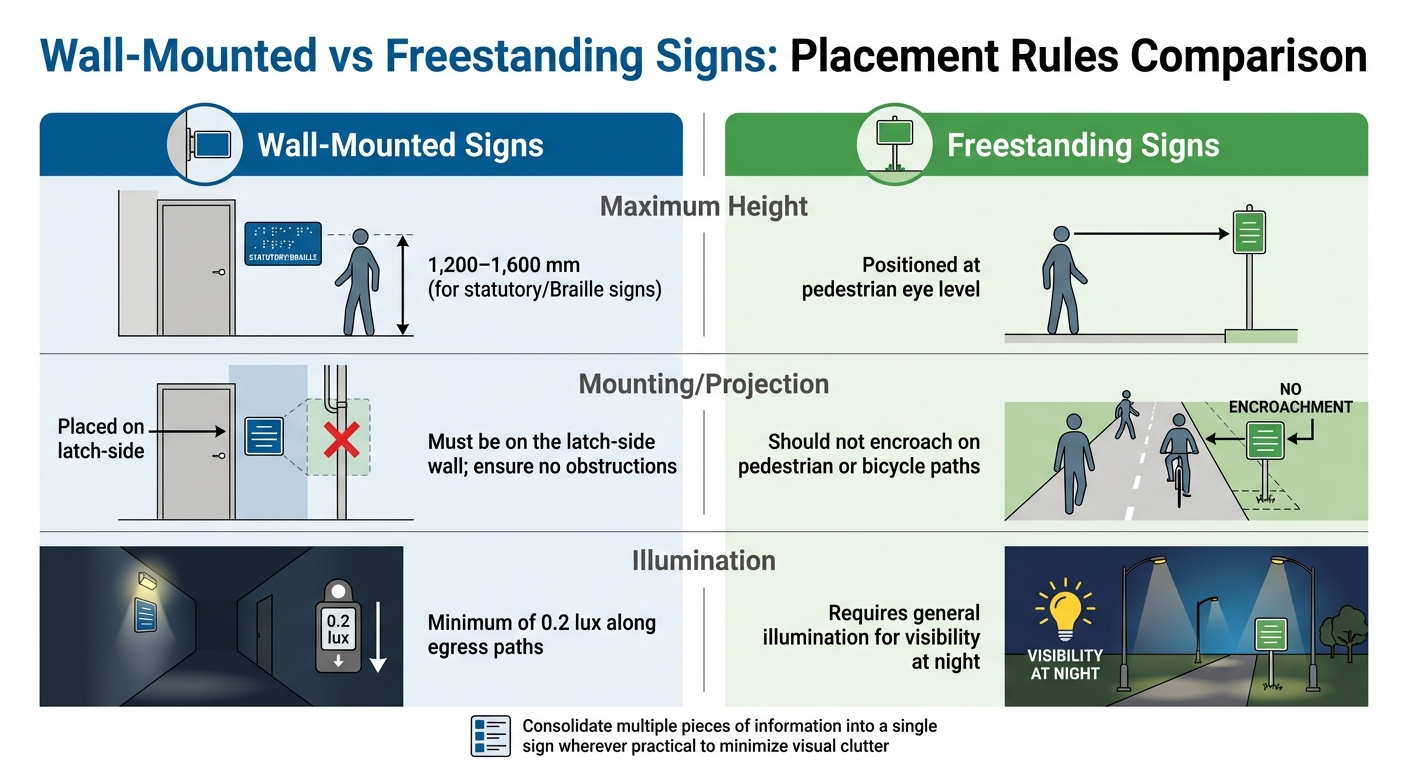
Wall-mounted signs are the go-to option for statutory signage. For instance, braille and tactile signs for room identification, exits, and accessible facilities must be installed on the latch-side wall of doors. If no wall space is available, mounting on the door itself is acceptable[1]. These signs are critical for areas that require clear identification, such as toilets, exits, and plant rooms.
Freestanding signs, on the other hand, are ideal for open spaces and intersections where pathways meet[10]. However, they should never obstruct pedestrian or bicycle paths[10]. Unlike wall-mounted signs, which follow strict height requirements for accessibility, freestanding signs are typically installed at eye level for pedestrians[10].
Placement Rules Comparison
Here’s a quick comparison of placement rules for wall-mounted and freestanding signs:
| Aspect | Wall-Mounted Signs | Freestanding Signs |
|---|---|---|
| Maximum Height | 1,200–1,600 mm (for statutory/Braille signs)[1] | Positioned at pedestrian eye level[10] |
| Mounting/Projection | Must be on the latch-side wall; ensure no obstructions[1] | Should not encroach on pedestrian or bicycle paths[10] |
| Illumination | Minimum of 0.2 lux along egress paths[1] | Requires general illumination for visibility at night[10] |
To minimise visual clutter, try to consolidate multiple pieces of information into a single sign wherever practical[10]. Following these guidelines helps ensure wall-mounted and freestanding signs provide effective navigation while adhering to Australian workplace safety standards.
Inspecting and Maintaining Wayfinding Signs
Under Australian WHS laws, wayfinding signs must always remain visible and functional. This means business owners have a responsibility to regularly inspect and maintain these signs to ensure compliance and safety[14].
Regular Inspection Schedule
A thorough signage audit should be conducted at least every six months. However, if there are structural changes, department relocations, or alterations to traffic flow, an immediate inspection is necessary[14].
During these checks, look for issues like faded text, peeling edges, loose fixings, or any physical damage to brackets and supports[1]. Additionally, check that visibility hasn’t been obstructed by external factors like overgrown vegetation or relocated equipment[2]. Emergency exit signs require special attention – ensure they function properly even during power outages[1].
After the inspection, address any problems promptly to keep your signs in top condition.
Maintenance Procedures
Keeping signs clean is essential for maintaining their legibility. Use appropriate cleaning agents to remove dirt, and for graffiti or paint damage, apply cleaning methods that won’t harm the sign’s coating or text[13][2].
If a sign is damaged or fails to meet compliance standards, replace it with durable workplace safety signs made from materials like aluminium or polypropylene, which are suited to Australia’s weather conditions[14]. For braille and tactile signs, ensure they are mounted at a height between 1,200 mm and 1,600 mm above the floor, with at least a 30% luminance contrast between characters and their background[1]. Maintaining a digital logbook to record all inspections, repairs, and replacements is a good practice, as it helps demonstrate compliance during WHS audits[14][1].
Here’s a quick summary of key checks and actions:
| Maintenance Category | What to Check | Action Required |
|---|---|---|
| Legibility | Faded text, dirt, graffiti, or poor lighting | Clean the surface, improve lighting, or replace with UV-resistant materials[14][13] |
| Physical Condition | Peeling edges, loose fixings, or damaged supports | Re-secure, tighten bolts/brackets, or replace supports as needed[1][13] |
| Compliance | Outdated symbols or incorrect braille | Replace with signs that meet NCC Spec 15 or AS 1319 standards[14][1] |
| Emergency Systems | Battery failure or low luminance | Test for 90 minutes and replace photoluminescent or electric components if required[1] |
Conclusion
Main Points
Placing wayfinding signs correctly ensures a workplace that’s both safe and easy to navigate independently. The essentials are simple: braille and tactile signs must be installed between 1,200 mm and 1,600 mm above the finished floor level, on the latch side of doors. Key features include exit signs visible during power outages for at least 90 minutes and a 30% luminance contrast between text and background[1].
Your responsibilities under the National Construction Code and Australian Standards are straightforward. Signs should be positioned where people naturally look – near decision points, above exits, and along clear escape routes. Use matte finishes to minimise glare, size symbols appropriately at 15 mm per metre of viewing distance, and ensure emergency lighting provides at least 0.2 lux along evacuation paths[1][2].
Regular inspections are essential to catch issues like fading, damage, or obstructions, ensuring compliance and safety. If signs fall short of standards, replace them with durable materials like aluminium that can withstand Australia’s harsh conditions. WorkSafe ACT emphasises:
"For maximum effectiveness, safety signs should be maintained in good condition, kept clean and well illuminated"[2].
Proper wayfinding signage not only protects your business from legal risks but also ensures everyone – regardless of their mobility or vision – can navigate your workplace with ease. Investing in compliant signage and routine upkeep is a smart choice, especially when compared to the potential costs of workplace accidents or legal penalties. Meeting these standards helps foster a workplace where safety is a shared priority.
FAQs
Which Australian standards apply to wayfinding signs?
The relevant Australian standard for wayfinding signs is AS 1744. This standard sets out the guidelines for designing and positioning signs to ensure they communicate effectively and provide clear guidance. Following these rules is crucial for maintaining safety in workplaces and aiding efficient navigation.
Where should braille and tactile signs be mounted?
Braille and tactile signs need to be mounted on walls, specifically on the latch side of doors, at a height of 1200mm to 1600mm from the floor. These signs should be strategically positioned at crucial points like entrances, exits, toilets, stairs, ramps, lifts, and emergency exits. This ensures accessibility for all and aligns with Australian standards.
Do exit signs need backup lighting during outages?
Yes, exit signs are required to have backup lighting that remains operational during power outages, typically for a minimum of 90 minutes. This is crucial for ensuring safe evacuation and meeting Australian safety standards, including AS/NZS 2293.2:2019. Backup lighting plays a key role in maintaining visibility and directing occupants to safety during emergencies.
Related Blog Posts
You may also be interested in
FAQs About Workplace Safety Signs in Australia
AS 1319 sign types, placement, materials and maintenance for workplace safety and WHS compliance in Australia.
Restricted Area Signs vs. No Entry Signs
Compare No Entry and Restricted Area signs in Australian workplaces — meanings, design differences and AS 1319 compliance.
How to Spot Workplace Signage Gaps
Audit your workplace for missing, faded or non‑compliant signs under AS 1319 to reduce incidents and avoid WHS fines.
Symbol Design: Global Standards Explained
Explains ISO 7010 and ISO 3864: standard symbols, colours and sizing for clear, language‑free safety signage and AU compliance.
Hazard Sign Visibility Planner
Plan hazard sign placement for max visibility with our free tool. Ensure safety by finding the best spot, height, and angle—try it now!