Ultimate Guide to Safety Sign Placement in Australia
Properly placed safety signs save lives and help businesses comply with Australian Work Health and Safety (WHS) laws. In 2023–24, Australia saw 146,700 serious workers’ compensation claims, many of which could have been avoided with better hazard communication. Safety signs ensure hazards are clearly identified, promote safe practices, and guide people during emergencies.
Here’s what you need to know:
- Legal Standards: WHS laws require compliance with AS 1319-1994, which governs safety sign design and placement.
- Types of Signs: Australia uses six categories of signs – Danger, Warning, Prohibition, Mandatory, Emergency, and Fire – each with specific colours and purposes.
- Placement Rules: Signs must be visible, legible, and appropriately sized based on viewing distance. For example, pictograms should be 15 mm tall per metre of viewing distance.
- Penalties for Non-Compliance: Fines range from $159,000 to $11,839,000 for organisations, depending on the severity of the breach.
- Materials Matter: Outdoor signs should use durable materials like reflective aluminium or UV-stable polypropylene to withstand harsh Australian conditions.
- Regular Maintenance: Inspect signs twice a year to ensure they remain visible and undamaged.
Whether you’re managing a construction site, warehouse, or office, following these guidelines ensures compliance, reduces risks, and protects everyone on-site.
Signage and Demarcation Awareness E-learning
Legal Requirements for Safety Signs in Australia
Workplace Health and Safety (WHS) laws in Australia require Persons Conducting a Business or Undertaking (PCBUs) to display safety signs that meet the AS 1319-1994 standard. This standard outlines the design, layout, and application of safety signs in occupational settings [2]. Here’s a closer look at how these regulations apply to different workplace hazards.
WHS Regulations Explained
WHS regulations demand clear, visible signage for various hazards. For instance, Regulation 353 mandates businesses to place warning signs near hazardous chemicals, ensuring they are easily seen by anyone approaching. Breaching this regulation results in a Tier E penalty [4].
Regulation 68, addressing confined spaces, requires signs at every entry point, clearly stating that a permit is needed for access. Non-compliance leads to a Tier G penalty – $28,390 for organisations and $5,678 for individuals, effective from 1 July 2025 [5].
Construction sites have specific signage requirements. Principal contractors must display their name, contact details (including after-hours numbers), and site office information. In Western Australia, additional details like the builder’s registration number and nominated supervisor’s name must also be shown. Similarly, asbestos removal sites are required to display specific warning signs [6].
"A person who is issued a notice must display a copy of the notice, in a prominent place at or near the workplace or part of the workplace where work affected by the notice is taking place. It is an offence not to display the notice." – Safe Work Australia [7]
Non-Compliance Penalties by State and Territory
WHS regulators, such as SafeWork NSW and WorkSafe Victoria, enforce compliance through inspections, improvement notices, prohibition notices, and on-the-spot fines [7]. Most Australian states and territories (ACT, NSW, NT, QLD, SA, TAS, WA, and the Commonwealth) adhere to the Model WHS laws, while Victoria operates under its Occupational Health and Safety Act 2004 [8].
Penalties for non-compliance are divided into three categories, based on the severity of the breach and the level of risk posed:
| Offence Category (as of 1 July 2025) | Individual (PCBU or Officer) | Individual (Other) | Body Corporate |
|---|---|---|---|
| Category 1 (Gross Negligence/Reckless) | $2,368,000 | $1,183,000 | $11,839,000 |
| Category 2 (Failure + Risk of Injury) | $475,000 | $237,000 | $2,373,000 |
| Category 3 (Failure to Comply with Duty) | $159,000 | $79,000 | $795,000 |
In addition to fines, regulators can issue adverse publicity or restoration orders to address breaches [7]. Penalty amounts are adjusted annually in line with the Australian Consumer Price Index [8].
These legal frameworks provide the groundwork for understanding the AS 1319-1994 standards, which are discussed in the following section.
AS 1319-1994 Standards for Safety Signs

AS 1319-1994 outlines the standards for designing, placing, and sizing safety signs in Australian workplaces. It uses a universal system of colours and symbols to ensure clear communication of hazards and instructions [9][10][12]. While the official document can be purchased from Standards Australia for $160.69 (GST included), most safety sign suppliers adhere to these specifications. These standards also provide the foundation for proper sign placement, which will be discussed in later sections.
Design and Colour Requirements
The standard specifies clear rules for colours and designs to ensure hazards and instructions are instantly recognisable. For instance:
- Danger signs: Feature white "DANGER" text within a red oval surrounded by black.
- Warning signs: Use yellow triangles with black borders to highlight cautionary messages.
- Prohibition signs: Display a red circle with a diagonal slash over a black symbol on a white background to indicate forbidden actions.
- Mandatory signs: Use blue discs with white symbols to communicate required actions, such as wearing protective equipment.
- Emergency information signs: Include white text or symbols on a green background to indicate first aid areas or exits.
- Fire signs: Feature white symbols on a red background to identify firefighting equipment.
To maintain visibility, signs must contrast sharply with their mounting surfaces. For example, a white-background sign placed on a white wall would lose its effectiveness. Specific areas like first aid rooms must be marked with a green sign featuring a white cross [10].
Size and Visibility Requirements
The size of a safety sign depends on the hazard’s severity and the distance from which it needs to be seen. The standard specifies that pictograms should measure 15 mm in height per metre of viewing distance. Similarly, uppercase and lowercase text should be 5 mm and 4 mm in height per metre, respectively [11][13]. For example:
- At 10 metres, the pictogram should be at least 150 mm tall, with uppercase text at 50 mm and lowercase text at 40 mm.
- At 20 metres, these measurements increase to 300 mm, 100 mm, and 80 mm, respectively.
| Viewing Distance | Min. Pictogram Size | Min. Upper Case Text | Min. Lower Case Text |
|---|---|---|---|
| 2 Metres | 30 mm | 10 mm | 8 mm |
| 5 Metres | 75 mm | 25 mm | 20 mm |
| 10 Metres | 150 mm | 50 mm | 40 mm |
| 15 Metres | 225 mm | 75 mm | 60 mm |
| 20 Metres | 300 mm | 100 mm | 80 mm |
| 30 Metres | 450 mm | 150 mm | 120 mm |
When determining sign placement, consider the maximum viewing distance and ensure the size meets these requirements. Factors like lighting and environmental conditions can also impact visibility. For items like fire extinguishers, signs should be installed either above or next to the equipment and no higher than 2 metres from the floor [10][12][13].
Types of Safety Signs and Where to Place Them
Safety Sign Types and Placement Requirements in Australia
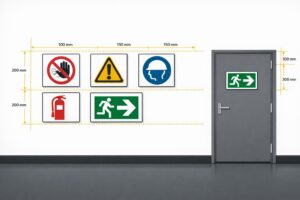
Australian workplaces rely on six categories of safety signs, each with distinct colours and placement rules. These signs, aligned with AS 1319-1994, are critical for maintaining safety and compliance. Below is a breakdown of the categories and optimal placement guidelines based on these standards.
| Sign Category | Visual Features | Purpose | Placement Example |
|---|---|---|---|
| Prohibition | Red circle with a slash, white background | Prohibits specific actions | Entrance to flammable liquid storage areas (e.g., "No Smoking") |
| Mandatory | Blue circle, white symbol | Indicates required actions or PPE | Entrance to fabrication bays ("Wear Safety Glasses") |
| Danger | Red oval within a black rectangle, "DANGER" text | Warns of life-threatening risks | High voltage switch rooms; confined spaces |
| Warning | Yellow triangle, black symbol | Warns of non-fatal hazards | Near wash-down areas (e.g., "Slippery Surface") |
| Emergency | Green background, white text/symbol | Locates safety or first aid equipment | Above first aid kits; along exit routes |
| Fire | Red background, white text/symbol | Locates firefighting equipment | Adjacent to fire extinguishers or hose reels |
Prohibition Signs
Prohibition signs are essential at access points and decision-making locations, ensuring workers are informed before entering restricted areas [14]. For instance, a "No Smoking" sign should be placed at the entrance of a flammable liquid storage area, not deep inside. To maximise visibility, mount these signs on a contrasting background at eye level – approximately 1,500 mm high – and ensure they are visible from the direction workers approach [12].
Mandatory Signs
Mandatory signs enforce specific actions or behaviours, such as wearing personal protective equipment (PPE). These signs should be placed at the exact location where the required action begins [14]. For example, a "Wear Safety Glasses" sign belongs on the door to a fabrication bay, not down a corridor 10 metres away. The blue circular design is highly noticeable, but avoid placing these signs on moving surfaces to maintain consistent visibility [10].
Warning and Hazard Signs
Warning signs address non-life-threatening hazards, like slippery surfaces, while danger signs are reserved for life-threatening risks, such as high voltage areas or confined spaces. To avoid desensitisation, use danger signs only in high-risk areas [14]. Place these signs well in advance of hazards to allow workers time to react. For instance, a "Slippery When Wet" sign should be positioned several metres before the hazard, not directly at the wet area.
"You must put the sign next to the hazard, and it must be clearly visible to people approaching the hazard." – Safe Work Australia [3]
Emergency and Fire Signs
Emergency signs guide workers to safety and must be visible from doorways and along corridors [14]. Exit signs should be mounted above doors and along escape routes to ensure workers can navigate to the nearest safe exit from any location. Fire equipment signs, such as those indicating extinguishers or hose reels, should be placed directly above or adjacent to the equipment [10][12]. This placement ensures visibility, even in smoke-filled conditions during an emergency.
sbb-itb-9950c92
6 Rules for Proper Safety Sign Placement
Placing safety signs correctly is critical to ensuring they serve their purpose effectively. Following these six rules can help maintain visibility, accessibility, and compliance over time [16].
Rule 1: Place Signs Where They Can Be Seen
The first step is positioning signs within the observer’s natural line of sight. Signs placed too high or low may go unnoticed, especially in urgent situations [2].
In areas with poor lighting or challenging viewing conditions, increasing sign size by at least 50% can help. For pictograms, aim for 15 mm per metre of viewing distance as outlined in the AS 1319 standards [2][11]. Make sure to use contrasting backgrounds to enhance visibility and avoid overcrowding an area with too many signs, as this can dilute their impact [16]. Group related signs together, like Hazchem, GHS, and PPE signs, to deliver a clear and consistent safety message [16].
Finally, ensure the mounting location avoids physical hazards or obstructions that could impede visibility.
Rule 2: Choose Safe Mounting Locations
Mount signs at heights that keep them visible and out of harm’s way [2][16]. Signs placed too low risk being damaged by equipment, while those in high-traffic areas could obstruct movement [16].
Avoid locations where signs might be hidden by open doors, stacked materials, or other visual barriers [2]. Opt for permanent placements that won’t be affected by future equipment installations or layout changes [16].
Remember, installation itself can pose risks. Workers installing exterior signs may face hazards like falls from heights or contact with overhead electrical lines [17]. Always follow proper safety protocols and conduct a risk assessment before installation.
Once locations are secure, focus on using materials that can withstand environmental challenges.
Rule 3: Use Materials That Last
Australia’s tough weather conditions demand durable materials. For outdoor signs, aluminium with a thickness of 1.6 mm offers excellent resistance to corrosion, while UV-stable polypropylene is ideal for indoor or moderately exposed areas, lasting 3 to 5 years [18][15].
"AS1319 does not specify a required material or nominal size for a safety sign but does stress that the type of safety sign used should be suitable for the intended application."
– WorkSafe ACT [2]
Choose materials based on the specific environment. Reflective aluminium with Class 2 (Engineer Grade) sheeting is over 20 times more visible than non-reflective signs, making it a must for low-light or emergency situations [15]. For temporary construction sites, lightweight and cost-effective corflute signs can last up to 3 years [18]. Self-adhesive vinyl is another versatile option, ideal for curved surfaces or machinery, offering up to 7 years of outdoor durability and over 8 years indoors [18].
Without proper care, exposure to dust, machinery, or UV light can accelerate wear and tear [16]. Regular maintenance, such as cleaning and ensuring adequate lighting, helps extend the lifespan of your signs [2].
| Material Type | Best Use Case | Outdoor Durability | Key Features |
|---|---|---|---|
| Reflective Aluminium | High-strength/Corrosive areas | High | Corrosion resistant, Class 2 reflective [18] |
| Colorbond Steel | General Outdoor | 5–8 Years | Powder-coated finish [18] |
| Polypropylene | All-climate Outdoor | 3–5 Years | UV stable, 100% recyclable, food safe [18] |
| Self-Adhesive Vinyl | Smooth surfaces/Indoor | Up to 7 Years | Chemical and fade resistant [18] |
| Corflute | Construction/Temporary | Up to 3 Years | Lightweight, low cost [18] |
How to Assess Your Site and Plan Sign Placement
Taking a structured approach to site assessment ensures safety signs are placed effectively. This process aligns with the four-step risk management framework: identifying hazards, assessing risks, controlling risks, and reviewing control measures [19].
How to Identify Hazards
Start with a thorough site walkthrough to pinpoint risks such as deep excavations, trip hazards, chemical storage, or high-risk operations [6][19].
"Risk management involves thinking about what could happen if someone is exposed to a hazard and how likely it is to happen."
– Safe Work Australia [19]
This step helps determine where signs are most needed, such as at construction site entrances or near chemical storage areas. Tailor the process to address both general site risks and any industry-specific concerns, ensuring no critical area is overlooked.
For construction sites, place signs at the entrance displaying the principal contractor’s contact details and the location of the site office [6]. If your chemical inventory exceeds the thresholds in Schedule 11 of the WHS Regulations, you must display placards [3]. For example, outer warning placards (HAZCHEM) need to be 120 mm high and 600 mm wide, with red lettering 100 mm high on a white or silver background [3].
Identify areas where personal protective equipment (PPE) is mandatory, such as zones requiring safety footwear, and position signs at entry points to these areas [6]. Specific hazards, like asbestos removal or deep excavations, demand tailored signage based on a detailed risk assessment [6].
Steps for Mapping Sign Locations
Once hazards are identified, plan where to place each sign for maximum effectiveness. A detailed placement map helps avoid compliance gaps and ensures signs are clearly visible. Consider the worker’s first point of contact with each hazard to confirm that the planned location isn’t obstructed [3].
For workplace entrances, position HAZCHEM placards at all emergency access points [3]. For bulk storage – containers exceeding 500 L or 500 kg – place placards directly on or next to the container or storage area [3]. Packaged goods require placards at each entrance to the storage area [3].
Use the ‘mm per metre’ rule to ensure signs are readable: allow 15 mm for pictograms and 5 mm for upper-case text per metre of viewing distance [11]. This ensures workers can read signs without straining, even from a distance. For bulk storage placards, black lettering on a white background must be at least 100 mm high, or 50 mm if using two lines [3]. These dimensions help maintain consistency across all sign placements.
| Sign Type | Required Placement | Specific Requirement |
|---|---|---|
| Outer Warning (HAZCHEM) | Each entrance to workplace | 120 mm × 600 mm; red text on white/silver [3] |
| Bulk Storage Placard | On or next to container/area | Lettering at least 100 mm high [3] |
| Construction Site Sign | Prominent position, visible from outside | Must include contractor name and 24/7 contact [6] |
| PPE Signs | Entrance to specific work area | Must comply with AS 1319 [6] |
When mapping signs for hazardous chemicals, ensure they follow the Australian Dangerous Goods (ADG) Code, not GHS pictograms [3]. This distinction is essential for compliance and effective emergency response.
How to Maintain and Inspect Safety Signs
Once safety signs are installed, keeping them in good condition is essential to maintain workplace safety standards. Signs should be audited twice a year and checked immediately after any site changes [21]. Assign a WHS officer to log and oversee these inspections [21]. Regular maintenance ensures signs remain effective and aligned with hazard mitigation strategies.
Signs should be mounted at a height of 1.5–2.1 metres, while fire signs need to be placed 2 metres above ground level [20][21]. Keep a detailed map of all sign locations to quickly identify missing or misaligned signs [21].
Check each sign for legibility, fading, cracking, or shrinking, especially those exposed to harsh UV conditions [18][21]. Outdoor signs have different lifespans depending on the material: Corflute lasts up to 3 years, Polypropylene 3–5 years, and Colorbond Metal or Vinyl 5–8 years [18]. Replace signs before they become illegible, as faded safety colours like red or yellow lose their AS 1319 symbolic meaning [21].
Keep signs clean, unobstructed, and visible in all lighting conditions [2][21]. Photoluminescent materials may be a good upgrade for low-light areas [21]. Remove outdated or duplicate signs to avoid visual clutter, which can cause "sign blindness" and confusion [21].
Inspection Procedures
A structured inspection checklist helps ensure signs remain compliant and visible. Start by verifying legibility and compliance with AS 1319-1994 standards. Inspect for physical damage, such as cracking, peeling, or rust, and confirm that emergency signs for fire exits, extinguishers, and first-aid stations are clearly visible and marked.
In areas with poor lighting, increase the size of symbols and text by at least 50% for better readability [2].
| Material | Expected Outdoor Lifetime | Key Characteristics |
|---|---|---|
| Corflute | Up to 3 years | Lightweight, low cost, ideal for temporary sites [18] |
| Polypropylene | 3 to 5 years | UV stable, food safe, resists cracking, recyclable [18] |
| Colorbond Metal | 5 to 8 years | Powder-coated steel, durable for outdoor use [18] |
| Self-Adhesive Vinyl | Up to 7 years | Heat and chemical resistant, adheres to clean surfaces [18] |
Common Placement Mistakes to Avoid
Faded red or yellow signs lose their AS 1319 symbolic meaning, so replace them promptly [21]. Poor contrast between signs and their backgrounds can make them hard to notice [2]. Outdated graphics or pictograms that don’t comply with current AS 1319-1994 standards can cause confusion and non-compliance [21].
Inconsistent sizing is another issue. Sign dimensions should match viewing distances, not just the available wall space. Undersized signs can force workers to strain their eyes [18]. Emergency or fire signs without clear directional arrows can delay response times when equipment or exits aren’t immediately visible [21]. Always include arrows to guide workers to safety equipment or exits.
Conclusion
Proper sign placement is critical for saving lives and reducing financial losses. In Australia, the numbers speak for themselves: 146,700 serious claims and an estimated $28.6 billion in annual costs underscore the importance of getting this right [1]. Beyond safety, correct placement also helps avoid expensive non-compliance penalties [22].
This guide has explored key aspects like AS 1319-1994 standards, material choices, optimal mounting, and the need for regular inspections. By focusing on these elements, you can ensure your signage not only meets legal requirements but also enhances safety on-site. Effective signage must be visible, legible, and positioned where workers naturally look, as outlined in the guidelines.
"When signage is thoughtful, intentional, and well-maintained, it does more than reduce accidents – it streamlines site operations, improves awareness, and empowers workers to move safely and confidently through high-risk areas." – Tim_LDCadmin, LDC Equipment [23]
Signs can fade, become damaged, or get obscured over time. Regular inspections are essential to identify these issues early. Replace worn or missing signs promptly, and keep detailed records of their locations. It’s equally important to ensure employees fully understand the meaning and purpose of each sign [2]. This combination of monitoring and communication fosters a strong safety culture across your organisation.
Whether you’re managing a construction site, warehouse, or manufacturing facility, the approach remains consistent: assess risks, place signs strategically, select durable materials, and maintain them diligently. These steps safeguard your workforce, uphold legal standards, and integrate safety into every operation.
For reliable and compliant safety signage solutions, visit PXP Safety at https://pxpsafety.com.au.
FAQs
What are the consequences of not following safety sign regulations in Australia?
In Australia, failing to follow safety sign regulations can lead to hefty penalties under the national Work Health and Safety (WHS) laws. Businesses could be fined up to $23,100, with additional penalties depending on the state. For instance, in Western Australia, fines range between $5,000 and $25,000, depending on the severity of the violation.
Beyond financial penalties, non-compliance can result in stop-work orders, workplace shutdowns, or even prosecution. In extreme cases, individuals responsible may face criminal charges, which could include imprisonment. Ensuring that workplace signage complies with Australian standards is crucial – not just to avoid penalties, but to create a safe environment for everyone.
How often should workplace safety signs be checked and maintained?
Safety signs in Australian workplaces need to be inspected at least every three months. This ensures they stay clear, visible, and easy to read. If any signs are found to be damaged, faded, or blocked from view, they should be fixed or replaced right away to uphold workplace safety and compliance.
Routine checks are crucial to confirm that your signage aligns with Australian Standards and continues to effectively convey hazards or instructions to both employees and visitors.
What should I consider when selecting materials for outdoor safety signs in Australia?
When choosing materials for outdoor safety signs in Australia, durability and weather resistance should be top priorities. Outdoor signs need to handle Australia’s tough conditions, including strong UV rays, heavy rainfall, high winds, and varying temperatures.
Materials like aluminium are a great choice because they resist corrosion and hold up well under UV exposure, ensuring they last longer. Treated acrylic or polycarbonate can also work well, especially when coated to protect against moisture and sunlight damage.
To ensure your signs stay effective and compliant, always account for local environmental factors and adhere to Australian standards. Select materials specifically made for outdoor use to keep safety and visibility intact over time.
Related Blog Posts
You may also be interested in
FAQs About Workplace Safety Signs in Australia
AS 1319 sign types, placement, materials and maintenance for workplace safety and WHS compliance in Australia.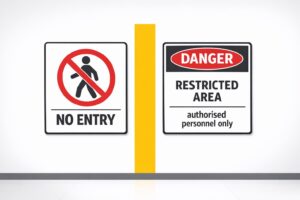
Restricted Area Signs vs. No Entry Signs
Compare No Entry and Restricted Area signs in Australian workplaces — meanings, design differences and AS 1319 compliance.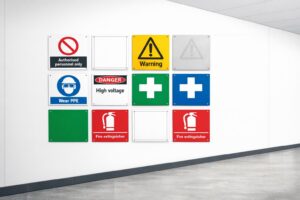
How to Spot Workplace Signage Gaps
Audit your workplace for missing, faded or non‑compliant signs under AS 1319 to reduce incidents and avoid WHS fines.
Symbol Design: Global Standards Explained
Explains ISO 7010 and ISO 3864: standard symbols, colours and sizing for clear, language‑free safety signage and AU compliance.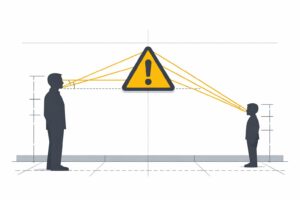
Hazard Sign Visibility Planner
Plan hazard sign placement for max visibility with our free tool. Ensure safety by finding the best spot, height, and angle—try it now!